
Installing a high-tensile fence involves stretching smooth wire between heavily braced corner and end posts to create a long-lasting perimeter that can handle significant pressure without sagging. Unlike traditional barbed wire or woven fence systems, high-tensile fencing relies on wire tensioned to 200-250 pounds per strand, supported by lightweight line posts spaced 40 to 50 feet apart. The technique delivers exceptional durability and cost efficiency per linear foot, making it the go-to choice for Canadian farm operators managing cattle, horses, or large acreage boundaries.
The installation process typically takes two to three days for an experienced team working on a quarter-mile section, though first-time installers should budget extra time to master proper tensioning and brace construction. Success hinges on three critical elements: building corner assemblies strong enough to resist thousands of pounds of cumulative wire tension, setting line posts at consistent spacing and height, and achieving uniform tension across every strand. Skip any of these fundamentals and you’ll face sagging wire, leaning corners, or premature failure.
High-tensile differs fundamentally from other fence types because the wire itself carries the structural load. There’s no woven mesh to provide rigidity, no heavy posts every eight feet. Instead, physics and proper technique create a fence that actually tightens in cold weather rather than loosening. Canadian winters put this system to the test, but correctly installed high-tensile consistently outperforms alternatives in freeze-thaw cycles.
This guide walks you through material selection, corner brace configurations, tensioning procedures, and final verification steps to ensure your fence performs as designed for decades.
What You’ll Need Before You Start
Choosing the Right Wire and Post Specifications
High-tensile fence works because you’re using thinner, stronger wire under much higher tension than traditional woven wire, but that only holds true if you choose the right components for your situation.
Wire gauge matters more than you might think. Standard high-tensile wire is 12.5-gauge, which handles 200-250 pounds of tension without stretching or breaking. Some installers try 14-gauge thinking they’ll save money, but it won’t hold proper tension and sags quickly under livestock pressure. Stick with 12.5-gauge for perimeter and interior fences. If you’re building something temporary or for lighter-duty applications like garden protection, 14-gauge works fine at lower tensions.
Post spacing is where high-tensile really pays off. You can space line posts 15 to 20 feet apart, sometimes even further on flat ground, compared to the 8 to 12 feet traditional fencing demands. This cuts your material costs and labour substantially. Rocky or rolling terrain calls for closer spacing (12-15 feet) to maintain wire height consistency. Sandy soil needs posts every 12-15 feet maximum since they don’t grip as firmly.
Choose posts suited to Canadian freeze-thaw cycles. Treated wood posts (minimum 4-inch diameter for corners, 3-inch for line posts) remain the most popular choice, they’re affordable and handle frost heave well when set below the frost line. Steel T-posts work for line posts in milder regions but can shift during freeze-thaw. Composite posts cost more upfront but eliminate rot concerns in wet climates like coastal BC or the Maritimes.
Safety Precautions and Site Preparation
High-tensile wire under tension stores enormous energy, releasing it suddenly can cause severe injury. Before you begin, understand that this isn’t standard barbed wire; a snapped strand can recoil at dangerous speed, and cutting tensioned wire without proper technique can result in whiplash injuries to your face, hands, or eyes.
Gather your protective equipment before starting: impact-resistant safety glasses, heavy leather work gloves, steel-toed boots, and long sleeves. If you’re renting equipment like post drivers or augers, inspect each piece before use and follow the manufacturer’s safety guidelines to protect your equipment and yourself.
Site preparation starts with locating underground utilities. In Canada, call before you dig, contact your provincial one-call service (Ontario One Call, BC One Call, or your regional equivalent) at least three business days before breaking ground. Hitting a buried power line, gas line, or telecommunications cable with an auger creates life-threatening hazards and costly repairs.
Verify your property lines before setting any posts. Check your survey or hire a surveyor if boundaries are unclear; moving a fence after installation is expensive and creates neighbour disputes. Walk the entire fence line looking for overhead power lines, trees with root systems that could interfere with posts, low spots that collect water, and changes in terrain that might require adjustments to your plan.
Clear brush, rocks, and debris from the fence line. Mark corner locations with stakes and run a string line to visualize the fence path. This preparation work prevents costly mistakes once posts are in the ground.
Step-by-Step Installation Process
Step 1: Layout and Corner Post Installation
Start by walking your planned fence line with stakes and mason’s twine to establish a straight, accurate path. Drive temporary stakes every 50-100 feet, then run string between them to visualize the complete route. This is your chance to avoid obstacles, adjust for terrain, and confirm you’re respecting property boundaries.
Mark your corner and end post locations first, these are the foundation of your entire fence system. In Canadian frost zones, you’ll need to set these critical posts to a depth of 3.5-4 feet, well below the frost line. Shallow corners will heave and shift through freeze-thaw cycles, ruining your tension and alignment within a single winter.
Dig corner post holes using a post-hole digger or power auger. For most high-tensile systems, a 6-8 inch diameter hole works well with standard 5-6 inch diameter posts. Set posts vertically using a level on two adjacent sides, then backfill with tamped soil or concrete. Concrete is strongly recommended for corners and ends, these posts will carry 800+ pounds of cumulative wire tension and need maximum stability.
Before the concrete sets, double-check that corner posts align perfectly with your string line and stand plumb in both directions. Any lean or misalignment now becomes permanent.
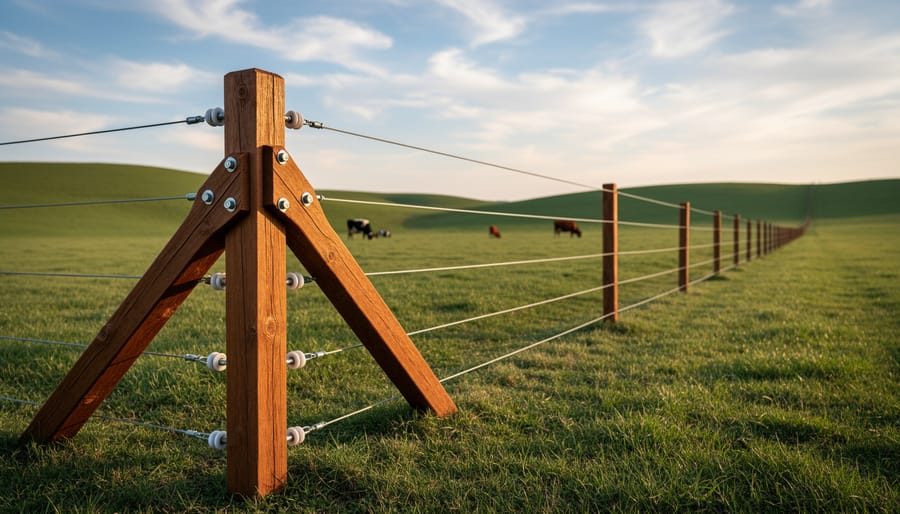
Once corner posts are secure (allow 24-48 hours for concrete to cure), you can begin planning your brace assemblies. The corner bracing system, whether H-brace or N-brace configuration, is what prevents your corners from pulling inward under wire tension. Without solid bracing, even properly set posts will fail. This isn’t optional; it’s the structural backbone of high-tensile fencing.
Step 2: Building Solid Corner Brace Assemblies
Corner braces are the backbone of your high-tensile fence, they absorb the tremendous wire tension so your fence stays taut for years. Without solid bracing, even the strongest corner posts will lean and fail.
The H-brace is the most common system for Canadian farms. Install a horizontal brace rail (4-6 inches diameter or 4×4 treated lumber) between your two corner posts at the same height, typically 4-5 feet up. Secure it tightly with lag bolts or through-bolts, not nails. The brace must fit snugly against both posts to transfer compression forces effectively.
Next, add a diagonal tension cable from the top of one post to the base of the other. Use 9-gauge smooth wire, wrapping it several times around each post. Insert a wooden dowel or metal rod between the wire strands and twist it like a tourniquet until the cable is extremely tight. The tension should make the wire hum when plucked. This diagonal prevents the posts from pulling together or spreading apart under wire load.
For N-brace assemblies, you’ll dig a third post at a 45-degree angle from the corner post to the ground, creating a diagonal compression brace instead of a tension cable. This works well in rocky soil where deep post setting is difficult.
Test the entire assembly by pushing hard on the corner post, it shouldn’t budge. Any movement means you need to tighten the diagonal or re-secure the horizontal brace before stringing wire.
Step 3: Setting Line Posts
Line posts support the wire between corners but don’t bear the same structural load as corner assemblies, so installation is more straightforward. Space them 15 to 20 feet apart, closer spacing (12-15 feet) works better if you’re fencing small livestock like sheep or goats, while cattle fencing can handle 20-foot intervals. Use a measuring tape and temporary markers to ensure consistent spacing before you start setting posts.
For depth, drive or dig line posts 2.5 to 3 feet deep in most soil conditions. In areas with significant frost heave, common across the Prairies and Ontario, go closer to 3 feet to anchor below the frost line and prevent posts from shifting during freeze-thaw cycles.
Driven vs. Augered Posts
Steel T-posts or driven wooden posts work well in firm, clay-heavy soils typical of southern Ontario and parts of the Prairies. Use a manual post driver or pneumatic driver (available through equipment rental) to pound them straight down. This method is faster and doesn’t disturb surrounding soil as much, which helps posts hold tight.
Switch to augered holes if you’re working in rocky ground, sandy soil that won’t grip a driven post, or locations where you need precise depth control. A tractor-mounted or gas-powered auger digs clean holes; drop the post in, backfill with tamped soil or gravel, and check plumb with a level.
Run a string line between corner posts at the planned wire height to keep line posts aligned. Check every few posts, even small deviations add up and create wire sagging or uneven tension down the line.
Step 4: Stringing and Attaching the Wire
With your corner assemblies solid and line posts set, you’re ready to run the wire, arguably the most satisfying part of the job, but also where mistakes become costly if you’re not careful.
Start at a corner post. Secure the wire end by wrapping it around the post three times, then twist it back on itself at least six inches using pliers. For the smoothest unrolling, mount the wire spool on a spinning dispenser or slip a metal rod through the center so it rotates freely as you pull. Never drag wire directly off a stationary spool, it creates kinks and weakens the steel.
Walk the fence line slowly, letting the wire pay out naturally. Keep slight upward pressure to prevent it from dragging on the ground and catching debris. If you’re working alone, attach the wire loosely to every third or fourth line post with a wire clip or a single loose staple just to keep it from dropping while you work the full length.
For non-electrified high-tensile fence, staple the wire to wooden line posts using fence staples driven at a slight angle, leaving about 1/8 inch gap between staple and wire. The wire needs to slide slightly during tensioning. Never pound staples tight against the wire at this stage. For steel posts, use wire clips that allow movement.
Run each strand at the planned height, bottom wire typically 10-12 inches off the ground, then spaced 8-10 inches apart depending on your livestock. A chalk line snapped along the posts helps maintain consistent height as you move down the line.
Step 5: Tensioning the Wire Correctly
Proper tensioning is where many DIYers stumble, but it’s straightforward once you understand the target. You’re aiming for 200-250 pounds of tension per wire strand, tight enough to eliminate sag between posts yet not so tight that you risk wire breakage or pull corner posts out of alignment.
Start at one corner post and attach your inline strainer or ratchet tensioner to the wire. Work methodically, tensioning one strand at a time rather than trying to do all wires at once. Crank the tensioner slowly and check your progress frequently. As you apply tension, you’ll see the wire lift and straighten between posts.
This sound test gives you a reliable field indicator without needing a tension gauge, though inexpensive inline gauges are available at most farm supply stores if you want precision.
Over-tensioning causes real problems. Wire stretched beyond its elastic limit will snap under stress or temperature changes, and excessive force can lean or uproot your corner posts despite proper bracing. In Canadian climates, remember that wire contracts in winter cold, effectively increasing tension, so slightly under-tensioning in summer months (closer to 200 lbs) gives you buffer room for seasonal contraction.
Step 6: Final Securing and Gates
Once your wire reaches the proper tension, secure it permanently to the corner and end posts using fence staples or wire clips. Drive staples at a 45-degree angle, never straight in, so the wire can slide slightly during temperature changes without breaking. Leave about 1/16 inch of space between the staple and the wire rather than pinching it tight against the post.
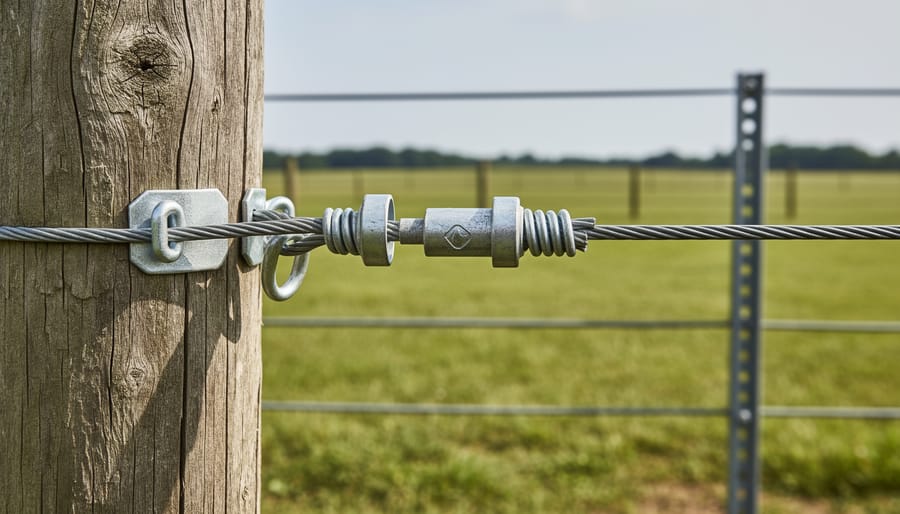
For wire termination at corners, use crimping sleeves to create permanent loops around the post. Thread the wire through a crimping sleeve, wrap it around the post, feed it back through the sleeve, and compress the sleeve with fence pliers or a crimping tool. This creates a secure connection that won’t slip under tension.
Plan gate locations before final securing. Leave a 12 to 16-foot opening for vehicle gates or 4 to 6 feet for walk-through gates. Install sturdy gate posts with deeper footings, at least 4 feet deep, since gates create additional stress on these anchor points.
Testing Your Installation and Making Adjustments
Once your fence is up and tensioned, thorough testing prevents failures and ensures livestock containment. Start your verification within 24-48 hours of completing installation, then check again after two weeks as the system settles.
Walk the entire fence line and perform these checks in order:
- Test corner brace stability by pushing firmly against each brace assembly, there should be zero movement or flex in the H-brace or diagonal supports.
- Check wire tension uniformity by plucking each strand like a guitar string; all wires should produce a similar musical tone and vibrate briefly when released, indicating consistent 200-250 lb tension.
- Verify post alignment by sighting down the fence line from each corner, posts should form a straight visual line with no lean or twist.
- Confirm proper height maintenance across the entire run, measuring bottom wire clearance (typically 8-12 inches) and top wire position at multiple points.
- Inspect secure attachment points at corners and ends, ensuring crimp sleeves are tight, staples haven’t pulled loose, and no wire slippage has occurred at tension devices.
Pay special attention to any sections that cross low spots or rises. These areas often reveal tension inconsistencies or post settlement issues first.
Expect minor adjustments during the first month. High-tensile wire can stretch slightly under load, and wooden posts may settle as soil compacts around them. Re-tension any wires that have loosened noticeably, a 10-15% tension loss is normal initially.
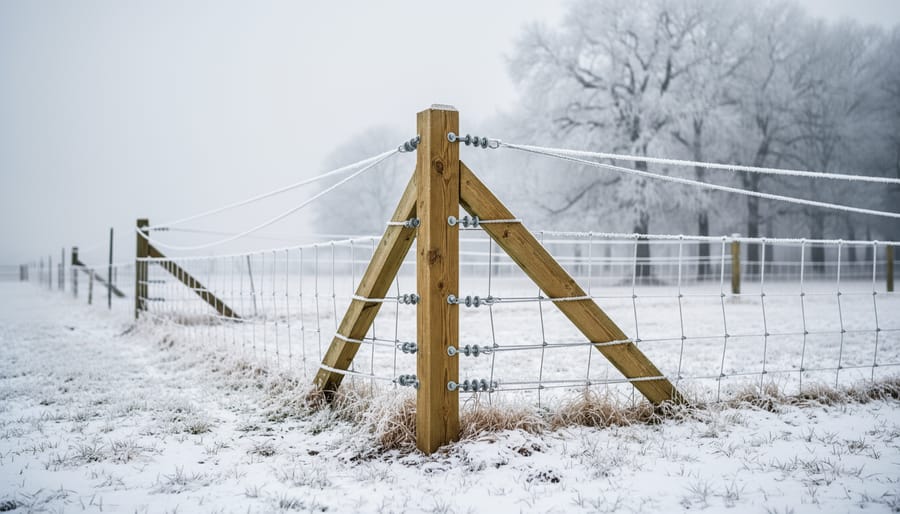
Canadian climates demand seasonal vigilance. Spring frost heave can lift posts and create dangerous slack, while winter freeze-thaw cycles may shift corner assemblies. Check tension each spring and fall, re-tightening as needed. If you’ve chosen to electrify your fence, verify charge levels regularly and install a solar charger with proper voltage output for your wire configuration.
Mark any problem posts with flagging tape. Persistent issues, posts that won’t stay aligned, chronic sagging between posts, or corners that creep, indicate deeper problems requiring correction before they compromise the entire fence line.
Common Mistakes to Avoid
The most costly mistake in high-tensile fence installation is inadequate corner bracing. Many first-time installers underestimate the enormous force that tensioned wire exerts on corners, upward of 1,000 pounds pulling in opposite directions. A weak H-brace or improperly angled diagonal brace will fail within weeks, causing the entire fence line to sag. Always use proper-diameter horizontal braces (at least 4 inches) and ensure compression diagonals are tight against the posts before tensioning any wire.
Incorrect post spacing creates uneven tension distribution and premature wire failure. Spacing line posts beyond 20 feet on high-tensile fence forces the wire to carry too much load between supports, while spacing them too close (as with traditional woven wire) wastes materials without improving performance. Stick to 15-20 foot intervals for livestock fencing, adjusting closer only on severe slopes or for specific containment needs.
Over-tensioning is surprisingly common among DIY installers who assume tighter is always better. Exceeding 250 pounds of tension on 12.5-gauge wire stretches it beyond its elastic limit, creating permanent deformation that leads to breakage during temperature swings. The wire should produce a clear metallic ring when plucked, not a dull thud or a high-pitched twang.
Wrong stapling technique on wood posts undermines the entire system. Driving staples flush against the wire prevents proper movement during thermal expansion and contraction, which is substantial across Canadian temperature ranges. Leave a quarter-inch gap on line posts so wire can slide freely, and never staple at corners where you need permanent attachment, use wire clips or wraps instead. Similarly, if you plan to add automation features like solar gate openers later, mark those locations now to avoid interfering with wire placement.
Skipping thorough site preparation guarantees problems down the line. Failing to locate buried utilities, ignoring property line verification, or neglecting to clear vegetation from the fence line creates hazards and legal complications that far exceed the time saved by rushing ahead.
Frequently Asked Questions
What wire spacing should I use for different types of livestock?
For cattle, space wires 10-12 inches apart with the bottom wire 18-20 inches from the ground. Sheep and goats require closer spacing of 6-8 inches between wires with the lowest wire 6 inches up. Horses need 4-5 strands spaced 12-14 inches apart starting 16 inches from ground level.
Should I electrify my high-tensile fence?
Electrification significantly improves livestock respect for fence boundaries and allows wider wire spacing, reducing installation time and materials. If you choose to electrify, plan your electric fence setup during installation by using insulators instead of staples and incorporating grounding rods at corner assemblies.
How long does it take to install high-tensile fence?
A capable two-person team can typically install 400-500 feet per day once corner assemblies are complete. For a half-mile perimeter fence, expect 4-6 full days including site prep and corner bracing construction. Rocky terrain, frozen ground, or extensive clearing adds time.
When does renting equipment make more sense than buying?
Rent specialized tools like post drivers, wire unrollers, and tensioning equipment if you’re fencing fewer than 2-3 miles or completing a one-time project. The combined rental cost for a week runs $200-400, while purchasing the same equipment exceeds $1,500. For ongoing farm expansion or annual maintenance, ownership becomes cost-effective.
Winter installation in Canadian climates presents challenges but remains feasible with adjustments. Frozen ground requires hydraulic post drivers rather than manual methods, and you’ll need to account for frost heave by setting posts slightly deeper than summer installations. Most experienced installers recommend spring or fall work when ground conditions cooperate and temperatures allow comfortable working pace. If winter installation is unavoidable, plan for slower progress and check wire tension again once ground thaws, as posts may shift slightly during spring melt cycles.
Installing a high tensile fence is a manageable project when you follow the proper sequence and pay attention to the critical details. The corner bracing system and correct wire tension form the foundation of a fence that’ll perform reliably for decades. Without solid H-braces or N-braces at your corners and ends, even perfectly tensioned wire will eventually sag and fail. Similarly, achieving that 200-250 pound sweet spot during tensioning makes all the difference between a fence that stays taut through Canadian winters and one that needs constant adjustment.
If you’re tackling this as a one-time project, renting specialized equipment like post drivers, augers, and wire tensioning tools often makes more financial sense than purchasing. You’ll get professional-grade results without the investment in tools you might only use once every few years.
Once your fence is up and tensioned, plan for seasonal checks and adjustments, particularly after freeze-thaw cycles. If you’re adding gates to your system, proper installation ensures winter gate reliability that matches your fence’s durability. With regular inspection and minor maintenance, your high tensile fence will provide secure livestock containment and property definition for years to come.