Installing a solar powered fence charger for cattle takes about 2 to 3 hours and requires only basic hand tools, making it an accessible DIY project for most farm owners. The system works by converting sunlight into electrical pulses that deliver a brief, safe shock when animals touch the fence, teaching cattle to respect boundaries without the need for grid power or frequent battery changes. This installation guide walks you through six complete steps, from site assessment and component selection to final testing and voltage verification, ensuring your perimeter stays secure year-round.
Solar fence chargers have become the standard for remote pastures and rotational grazing setups across Canadian farms in 2026, particularly where trenching electrical lines would be costly or impractical. The technology has matured significantly, with modern units delivering reliable performance even during overcast prairie winters or cloudy coastal conditions. Most systems include a rechargeable battery that stores energy during daylight hours, maintaining consistent voltage throughout the night and during periods of limited sun exposure.
Success depends on matching your charger’s output to your fence length and cattle temperament. Calves and dairy breeds typically respond well to lower joule ratings, while bulls and heavily-coated beef cattle in winter conditions need stronger pulses to feel the deterrent through thick hide and hair. Proper grounding and wire tension matter just as much as charger selection, which is why this guide covers every element from panel angle to earth rod placement, ensuring you get the full functionality your investment promises.
Why Choose Solar Power for Your Cattle Fence Charger
Solar-powered fence chargers eliminate the need for grid electricity, making them ideal for remote pastures and back forty grazing areas where running power lines would be prohibitively expensive. Canadian cattle operations often span hundreds of acres, and solar units can be positioned anywhere with adequate sun exposure, providing flexibility as you rotate grazing paddocks or expand your fencing system. You avoid monthly electricity costs entirely, and after the initial investment, the sun powers your fence for free.
Reliability in off-grid locations stands out as a major advantage. Grid-powered chargers leave you vulnerable to power outages during storms, exactly when livestock might test fences. Solar units with battery backup continue operating through cloudy periods and overnight, ensuring consistent containment. Maintenance requirements stay minimal: clean the solar panel a few times per season, check connections periodically, and verify voltage levels. No wiring inspections, no electrician calls, no utility company dependencies.
Canadian climate poses specific challenges that solar chargers handle well. Modern units charge effectively even on overcast days, and winter operation succeeds when panels are angled properly and kept free of snow accumulation. The environmental benefits align with sustainable farming practices, reducing your operation’s carbon footprint while cutting costs. For farms managing cattle across expansive grazing areas, solar power delivers independence, reliability, and long-term savings that grid-dependent systems simply cannot match.
Tools and Materials You’ll Need
Gathering the right equipment before you start saves time and ensures a smooth installation process. For a cattle fence charger system, you’ll need specialized components that work together to deliver consistent, safe electric pulses across your pasture perimeter.
Your primary components include the solar fence charger unit itself (with at least 0.5 joules output for cattle), the solar panel if not integrated into the charger, and a sturdy mounting post or bracket rated for outdoor Canadian weather. The charger’s joule rating matters significantly, cattle require higher energy output than smaller livestock, typically 0.5 to 2.0 joules depending on fence length and vegetation conditions.
Here’s your complete equipment checklist:
- Solar fence charger unit (0.5-2.0 joules, rated for cattle)
- Solar panel with mounting hardware (if separate from charger)
- Treated wooden post or metal bracket for charger mounting
- High-tensile fence wire or polytape (17-gauge or heavier)
- Ground rods, 6-foot copper-coated steel (minimum 3 rods)
- Fence insulators rated for electric fencing
- Galvanized wire connectors and clamps
- Cutoff switch for maintenance access
- Digital voltmeter or fence tester
- Hand tools: wrench set, screwdriver, wire cutters, post hole digger
The ground rod system deserves special attention, three 6-foot copper-coated rods provide adequate grounding in most Canadian soils, though clay-heavy or rocky ground may require additional rods. Your voltmeter is essential for verification, allowing you to measure fence voltage at multiple points and confirm the system delivers 4,000 to 6,000 volts for effective cattle containment. Quality insulators prevent power leakage and maintain voltage along the entire fence line.
Safety Precautions Before You Begin
Before you start installing your solar fence charger, take time to understand the risks involved. Electric fences deliver high-voltage, low-amperage shocks designed to deter cattle without causing serious harm, but improper installation can create hazards for both people and livestock. Keep your charger completely disconnected from all power sources, including the solar panel connection, throughout the entire installation process. This prevents accidental shocks while you’re handling wires and making connections.
Weather plays a significant role in installation safety, particularly in Canada where conditions can change rapidly. Avoid working during rain, snow, or when storms are forecast, as moisture increases conductivity and shock risk. If you’re setting up in spring or fall, check that the ground isn’t frozen solid, which complicates ground rod installation and reduces system effectiveness.
Wear insulated gloves rated for electrical work when making final connections, even if the unit is supposedly off. Keep livestock completely separated from the work area until installation is complete and tested. When you choose the right fence wire and handle it during setup, treat every wire as if it could be energized. Canadian electrical standards require proper grounding and labeling of electric fences, so familiarize yourself with local regulations before beginning your project.
Step-by-Step Installation Process
Step 1: Choose the Optimal Location
Position matters more than most farm owners realize when installing a solar fence charger. Start by identifying a spot roughly central to your fence line to minimize voltage loss across the system. The location must receive full sun exposure for at least six hours daily, facing south in Canada to capture maximum light year-round. Mount the unit 4-5 feet high on a sturdy post, well away from where cattle congregate or rub against structures.
Accessibility is critical for routine maintenance checks. Choose a spot you can reach easily, even during spring mud or winter snow. In Canadian climates, avoid low-lying areas where snow drifts accumulate and could bury the panel for weeks. Consider seasonal sun angles: the winter sun sits much lower on the horizon, so nearby buildings or tree lines that don’t shade the panel in summer might block crucial winter light. Scout your location in late fall or early spring to verify year-round sun access.
The charger must sit within practical wiring distance of your fence line, typically 50-100 feet maximum. Factor in terrain obstacles like rock outcrops or wet ground that complicate wire runs or grounding installations.
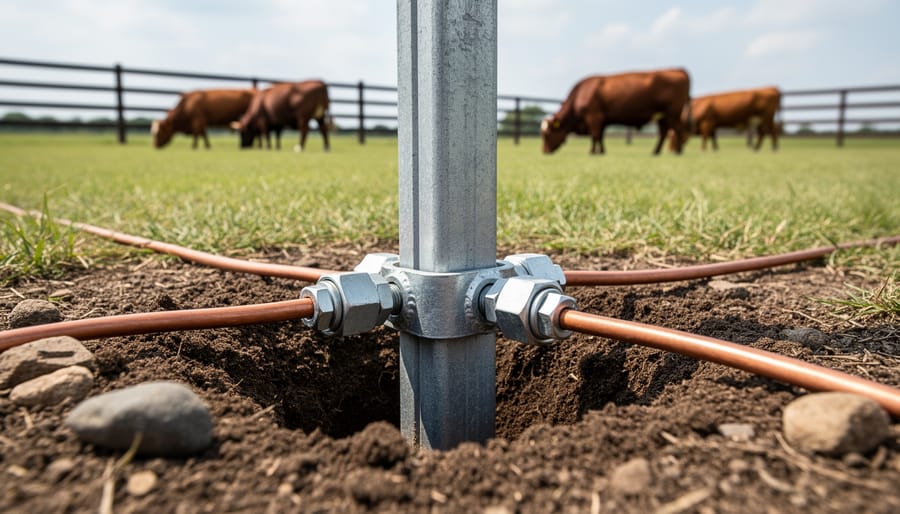
Step 2: Install the Ground Rod System
Proper grounding is the backbone of an effective electric fence system. Without it, your charger can’t complete the circuit when cattle touch the fence, rendering the entire setup useless.
Start by driving three to six ground rods into the soil, spacing them 6-8 feet apart in a straight line. Use copper-coated steel rods at least 5-6 feet long, hammering them until only 2-4 inches remain above ground. Moist soil conducts electricity far better than dry, so choose a location that stays naturally damp if possible. In rocky Canadian terrain, you may need a pre-drilled pilot hole or a longer rod to reach workable depth.
Connect the rods using 12.5-gauge galvanized wire, wrapping it tightly around each rod and securing with approved clamps. Every connection point must be clean and tight, corrosion or loose fittings will sabotage your ground system.
In frozen winter soil, ground effectiveness drops significantly. If you’re installing during cold months, consider burying ground rods deeper in fall or positioning them where snow melt and spring runoff keep soil moisture high. Test your ground system with a voltmeter: touch one probe to the fence and the other to the final ground rod. A reading above 300 volts means you need additional ground rods.
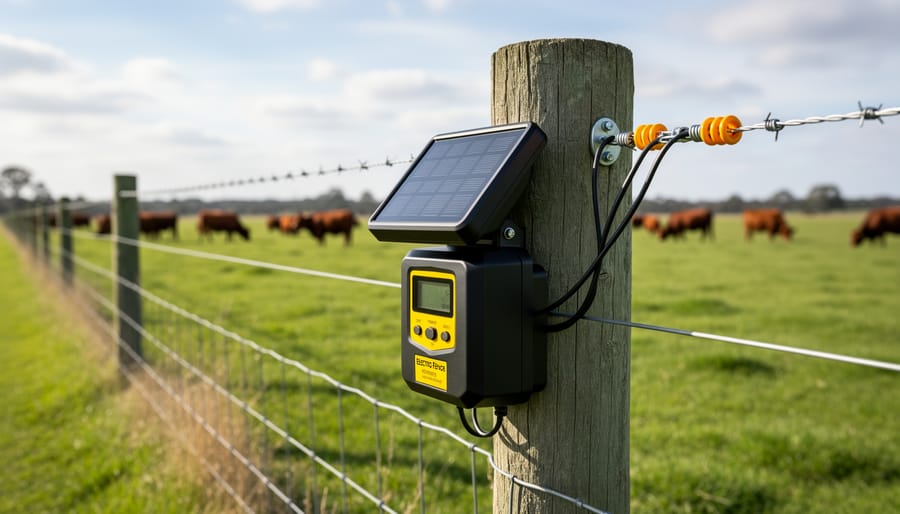
Step 3: Mount the Solar Charger Unit
With the charger location selected and ground rods installed, secure the solar unit to a sturdy mounting post or bracket. If using a wooden fence post, position it at least four feet above ground to keep the charger out of cattle reach while maintaining easy access for monitoring. Metal T-posts work well with dedicated mounting brackets designed for fence chargers.
Orient the solar panel to face true south in Canada, angled between 45 and 60 degrees from horizontal. This positioning maximizes sun exposure throughout the year, accounting for lower winter sun angles. In southern Canada, a 50-degree tilt typically provides the best year-round performance, while northern operations may benefit from steeper angles approaching 60 degrees.
Fasten all mounting hardware tightly using stainless steel or galvanized fasteners that resist corrosion in wet conditions. Ensure the charger box sits level and that any vents or drainage ports face downward to prevent moisture accumulation. Check that the solar panel cable reaches the charger unit without strain, and secure any loose wiring with weather-resistant clips to prevent wind damage or livestock interference.
Step 4: Connect the Ground System
With your ground rods properly installed, the next task is wiring them to your solar charger. Use 12.5-gauge insulated galvanized wire or heavier for the ground connection, thinner wire creates resistance that weakens your entire fence system. Strip about half an inch of insulation from each wire end, then attach one end to the charger’s ground terminal using the provided clamp. Tighten it firmly with a wrench; loose connections are a leading cause of voltage loss on cattle fences.
Run the ground wire to your first ground rod and secure it with an approved ground rod clamp, never twist wire around the rod or use electrical tape, as these methods corrode quickly in Canadian weather cycles. Connect each rod in your ground system using the same gauge wire and clamp method, creating a continuous chain. After all connections are made, gently tug each one to verify it’s solid. A voltmeter test will come later, but you should not see any wiggle or play at the terminals now.
Step 5: Connect to the Fence Wire
Start at the charger’s fence terminal, typically marked with a lightning bolt symbol or “fence” label. Run 12.5-gauge or heavier high-tensile galvanized wire from this terminal to your fence line. Keep this lead wire away from metal posts or structures that could cause grounding shorts. Secure it with stand-off insulators every 3-4 feet to prevent accidental contact.
At the fence connection point, wrap the lead wire tightly around the fence wire three times, then twist it back on itself for a solid mechanical connection. For permanent installations, crimp or solder this junction. If you’re running multiple fence wires (common for cattle to create a visible barrier), connect them with short vertical jumpers using the same wire gauge, ensuring all strands carry current.
Install a cutoff switch along the lead wire within 10 feet of the charger. This simple single-pole switch lets you safely de-energize the fence for repairs without disconnecting everything at the charger. Mount it on a post at chest height for easy access.
For multi-paddock setups, use a split-bolt connector at junction points to branch power to separate fence lines. Each branch should have its own cutoff switch. This configuration lets you isolate sections for rotational grazing while keeping other paddocks energized.
Step 6: Test and Verify the System
With all connections secure, turn on the charger and wait 30 seconds for the system to stabilize. Using a quality voltmeter designed for electric fences, touch the probe to the fence wire while standing on dry ground. A properly functioning cattle fence should read between 4,000 and 6,000 volts, adequate to deter cattle without causing harm. Test voltage at three points: near the charger, mid-way along the fence line, and at the farthest point from the charger. Readings should remain consistent within 500-1,000 volts across all locations.
If voltage drops below 3,500 volts anywhere, check for shorts caused by vegetation touching the wire, loose connections, or inadequate grounding. Test your ground system by creating a temporary short (touching a metal rod to the fence), then checking voltage on the ground rod itself, it should read less than 400 volts. Higher readings indicate you need additional ground rods. Walk the entire fence perimeter looking for insulators touching metal posts or wire sagging onto grass. Canadian farms often experience voltage loss during wet conditions when vegetation grows rapidly, so spring and summer require more frequent checks.
Verification and Ongoing Maintenance
Once your charger passes the Step 6 voltage tests, establish a verification routine to ensure long-term reliability. For the first month, check fence voltage weekly at several points along the line, readings should hold steady between 4,000 and 6,000 volts for cattle. After that, monthly checks suffice unless you notice livestock behavior changes or visible fence damage.
Maintenance Checklist:
- Clean solar panel surface monthly (more often after dust storms or near harvest periods)
- Inspect all wire connections quarterly for corrosion or loosening
- Walk the fence line monthly to clear vegetation touching wires
- Test battery charge level every two months if your unit has a replaceable battery
- Remove snow buildup from panels after major storms in winter
- Check ground rod connections each spring after freeze-thaw cycles
Canadian winters demand extra attention. Heavy snow can block solar panels for days, draining battery reserves. Brush off panels after storms and angle them steeper (closer to vertical) in regions with persistent winter snowpack. If temperatures drop below minus 20 Celsius regularly, consider moving the battery indoors or adding an insulated housing box.
When voltage drops unexpectedly, start troubleshooting at the charger itself, check battery charge and panel cleanliness first. Next, test your ground system by driving a metal rod into moist soil 100 feet from the fence, then measuring voltage between that rod and the fence wire. A reading above 200 volts indicates poor grounding. Walk the fence line looking for shorts: tall grass, sagging wire touching posts, or broken insulators. If you installed fence posts yourself, reviewing post hole digger tips can help you understand why proper post depth and stability prevent wire sag that causes shorts. Most voltage issues trace back to vegetation contact or loose connections rather than charger failure.
Frequently Asked Questions
How many joules do I need for a cattle fence charger?
For cattle, you need a minimum of 0.5 joules per mile of fence, but 1.0-2.0 joules per mile is better for reliable containment. A typical 2-joule solar charger handles up to two miles of single-wire fence effectively, even with some vegetation contact.
Will a solar fence charger work during Canadian winters or cloudy weather?
Yes, most quality units include a battery that stores charge for 2-3 weeks of operation without direct sun. In Canadian winters, keep the solar panel clear of snow and position it to catch maximum winter sun, which sits lower on the southern horizon.
How long does the battery last in a solar fence charger?
Internal batteries typically last 3-5 years with proper maintenance, though extreme cold can reduce lifespan. Some units use replaceable batteries that you can swap out, while others have sealed systems requiring full unit replacement.
Can I add more fence lines to my system later?
Yes, but check your charger’s joule rating and maximum distance specifications first. Adding lines reduces voltage per wire, so you may need to upgrade to a higher-output unit if you’re already near capacity.
What happens when cattle test the fence?
Cattle receive a sharp but harmless shock that teaches them to respect the boundary. Most animals learn after one or two contacts and won’t challenge the fence again, making electric fencing highly effective for cattle containment.
Do I need permits to install an electric fence in Canada?
Permit requirements vary by province and municipality. Most rural agricultural areas don’t require permits for on-farm livestock fencing, but check with your local township or county office before installation, especially if the fence borders public roads or neighboring properties.
These questions come up repeatedly on cattle operations across Canada, and the answers reflect real-world experience rather than theoretical guidelines. The joule calculation matters because underpowered chargers lead to livestock escapes, while the winter performance question addresses the biggest concern Canadian farmers have about solar equipment.
Battery lifespan directly affects your long-term operating costs. Factor in replacement costs when comparing solar units, since a cheaper charger with a short-lived battery costs more over five years than a quality unit with replaceable components. The expandability question matters if you’re starting small and planning to add paddocks later.
Installing a solar electric fence charger for cattle is a practical project that most farm owners can complete in a few hours using the 6-step process outlined above. From selecting the right location and establishing proper grounding through connecting your fence wire and verifying system performance, each step builds toward a reliable containment solution that works year-round on Canadian farms. Proper installation delivers consistent livestock control while eliminating ongoing electricity costs, making solar chargers particularly valuable for remote pastures and off-grid operations. When you’re ready to tackle fence installation or other farm infrastructure projects, Harvest Salvage offers equipment rentals including post hole diggers, fencing tools, and other specialized farm equipment to help you complete the work efficiently without the expense of purchasing tools you’ll only use occasionally.